 3Denlive
3De Quick Start Guide
Thanks to StereoDoro for creating it from the webpages
With 3De you will be able to produce nice stereo static compositions (JPG, PNG, etc) or animated stereo video montages (MP4).
If you have a question or encounter a problem with 3De, don't hesitate to post on the 3De dedicated group (see at the bottom of the page). Feedbacks are always welcomed, and a happy user is always a reward for a software developer.
Opening 3De for the first time
When launchnig 3De, you should get a screen like this:

⓵ Media collection: this left vertical panel displays the photos or vidéos you need to build the composition or the animation. You can also add images containing texts, backgrounds, objects, or framings. Each media is diplayed as a small thumbnail with few informations about it (like its file name). Each media can be in a different format (size, file type, etc). When a media is a static picture, a duration of 5 s is defined on it, to enable an easy manipulation with the software time logic.
⓶ Timelines: this bottom horizontal panel displays the clips of your composition. Each clip uses a media of the first panel. It always have a start time, and a duration. All clips are considered in the same format (size and ratio height/with). Thus, all medias are resized to fit in this format. You can define the project format to be identical to the media you have (for example HD 720).
⓷ Monitor: this central panel holds multiple purposes. 1) When the software is starting, it displays the latest news page. For some reasons (typically you are offline, or you have security rules blocking this on your machine), it may fail to load this page from the web site. In this case, you can access to this news page by clicking on the lamp button at the top right of the 3De application. 2) When you click on a media on the left panel, it displays a view of it, in its original format. 3) When you click on a clip on the bottom timelines, it display a view of it, in the project format. 4) It's also the player for the video or the composition you are creating (play, pause, etc).
⓸ Properties: this panel on the right of the Monitor hods multiple purposes. 1) When you click on a media on the left panel, it displays its properties (file name and EXIF), it also enables you to add a rotation on the media if the camera wasn't horizontal at the shooting time. You can collapse/expand each branch of the dislayed properties tree by a double-click on its ligne. 2) When you click on a clip on the bottom panel, it displays its properies (start time, duration, fade in/out, etc) and the properties of all actions/filters/effects associated to it. Each box of the Properties panel can be collapse/expanded by a click on its title.
⓹ Processors library: this panel displays the collection of actions/filters/effects you can associate to a clip. They are ordered by categories. You can collapse/expand each branch of the dislayed properties tree by a double-click on its ligne.
Importing a media in the media collection
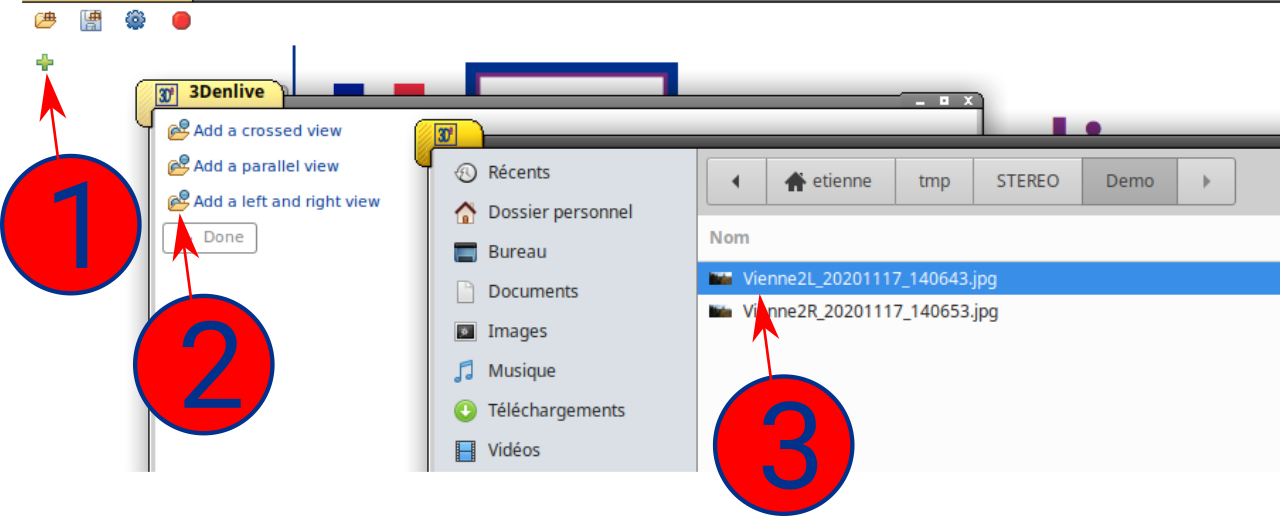
⓵ click on the green + button on top of the Media collection panel.
⓶ click on one of the three folder lines depending on the kind of media you want to open (crossed views, parallel views, or separated views a file for each). If you want to add a flat single picture, add it like a left and right view, and select the same file twice.
⓷ search for the folder on your disk where are the files, and double-click on the picture you want. If you've selected the left/right option, you have to do this twice, once for each view.
Points ⓶ and ⓷ may be done several times before closing the panel ⓶. You can even let this panel open while working on the main application window, to get it easily later.
The Medias collection panel should display a thumbnail for each stereo media you imported (at least one).
If you click on a media thumbnail, you should get something like this:
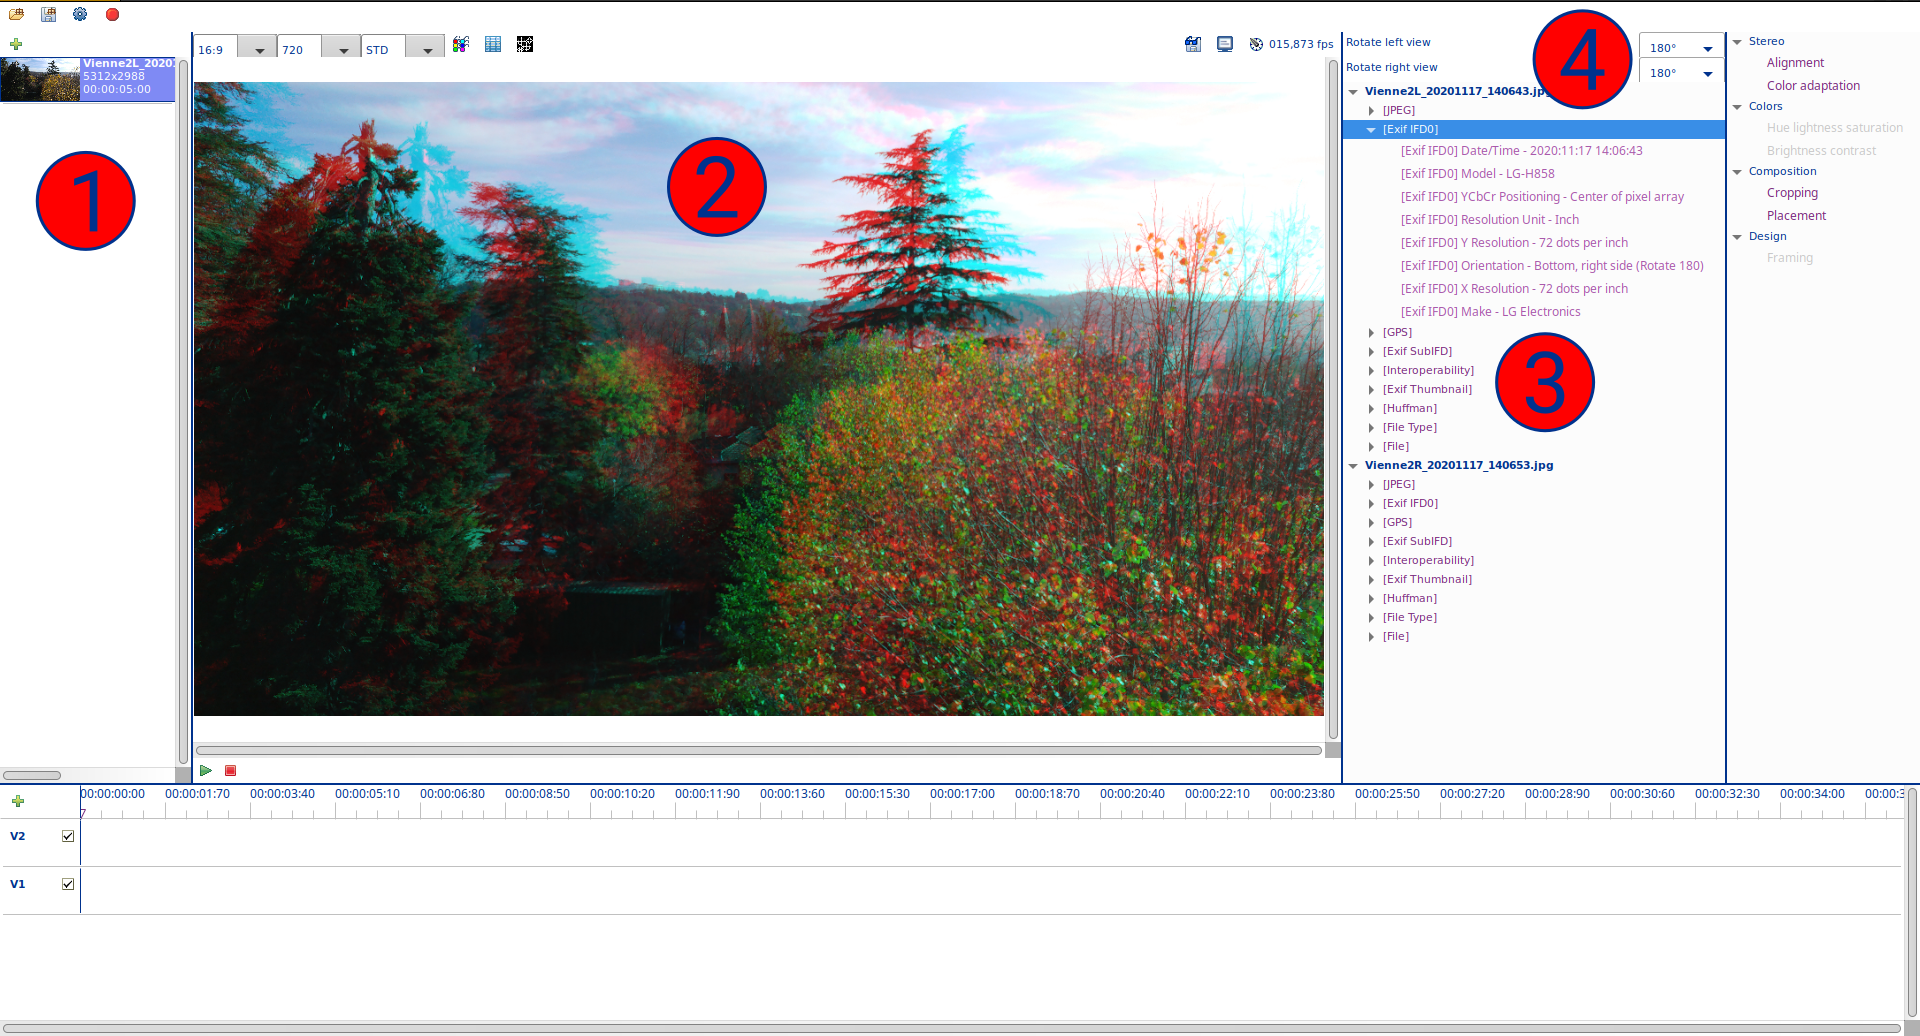
⓵ media thumbnail, with its file name, and a duration (arbitrarily set to 5 s for a static picture).
⓶ a stereo view of the media. By default, viewed as anaglyph: just a convenient way to work on it.
⓷ informations available on the media (file name, size, Exif, etc).
⓸ options you can set manually to rotate each media view in case the camera wasn't in the horizontal standard position at the shooting time.

